 Making a quilt is like making a work of art. From selecting the fabric to piecing the quilt together, it is a labor of love. The final product is a treasure to be handed down for generations. Keep reading for a step-by-step guide to get you started.
Before cutting any pieces, be sure to wash and dry your fabric to preshrink it. All-cotton fabrics may need pressing before cutting. Trim selvages from the fabric before you cut pieces.
Before you make a quilt, you may want to make a template. (Not all pieces require patterns—some pieces are meant to be cut with a rotary cutter and ruler.) Quilters have used many materials to make templates, including cardboard and sandpaper. Transparent template plastic, available at craft supply and quilt shops, is durable, see-through, and easy to use.
To make a plastic template, place the plastic sheet on the printed page and use a laundry marker or permanent fine-tip marking pen to trace each pattern. For machine piecing, trace on the outside solid (cutting) line. For hand piecing, trace on the inside broken (stitching) line. Cut out the template on the traced line. Label each template with the pattern name, letter, grain line arrow and match points (corner dots).
Place the template facedown on the wrong side of the fabric and mark around it with a sharp pencil.
If you will be piecing by machine, the pencil lines represent cutting lines. Cut on each marked line.
For hand piecing, the pencil lines are seam lines. Leave at least 3/4" between marked lines for seam allowances. Add 1/4" seam allowance around each piece as you cut. Mark match points (corner dots) on each piece.
You can do without templates if you use a rotary cutter and ruler to cut straight strips and geometric shapes such as squares and triangles. Rotary cutting is always paired with machine piecing, and pieces are cut with seam allowances included.
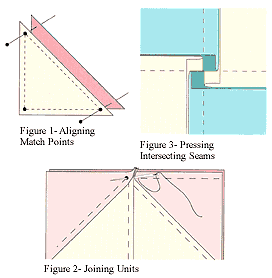 To hand piece, place two fabric pieces together with right sides facing. Insert a pin in each match point of the top piece. Stick the pin through both pieces and check to be sure that it pierces the match point on the bottom piece (Figure 1). Adjust the pieces as necessary to align the match points. (The raw edges of the two piecesmay not align exactly.) Pin the pieces securely together. To hand piece, place two fabric pieces together with right sides facing. Insert a pin in each match point of the top piece. Stick the pin through both pieces and check to be sure that it pierces the match point on the bottom piece (Figure 1). Adjust the pieces as necessary to align the match points. (The raw edges of the two piecesmay not align exactly.) Pin the pieces securely together.
Sew with a running stitch of 8 to 10 stitches per inch. Sew from match point to match point, checking the stitching as you go to be sure you are sewing in the seam line of both pieces. To make sharp corners, begin and end the stitching exactly at the match point; do not stitch into the seam allowances. When joining units where several seams come together, do not sew over seam allowances; sew through them at the point where all seam lines meet (Figure 2). Always press both seam allowances to one side. Pressing the seam open, as in dressmaking, can leave gaps between stitches through which the batting may beard. Press seam allowances toward the darker fabric whenever you can, but it is sometimes more important to reduce bulk by avoiding overlapping seam allowances. When four or more seams meet at one point, such as at the corner of a block, press all the seams in a "swirl" in the same direction to reduce bulk (Figure 3). 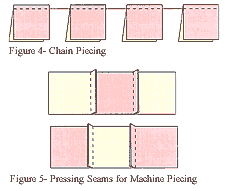 To machine piece, place two fabric pieces together with right sides facing. Align match points as described under "hand piecing" and pin the pieces together securely. To machine piece, place two fabric pieces together with right sides facing. Align match points as described under "hand piecing" and pin the pieces together securely.
Set the stitch length at 12 to 15 stitches per inch. At this setting, you do not need to backstitch to lock seam beginnings and ends. Use a presser foot that gives a perfect 1/4" seam allowance or measure 1/4" from the needle and mark that point on the presser foot with nail polish or masking tape. Chain piecing, stitching edge to edge, saves time when sewing similar sets of pieces (Figure 4). Join the first two pieces as usual. At the end of the seam, do not backstitch, cut the thread or lift the presser foot. Instead, sew a few stitches off the fabric. Place the next two pieces and continue stitching. Keep sewing until all the sets are joined. Then cut the sets apart. Press seam allowances toward the darker fabric whenever possible. When you join blocks or rows, press the seam allowances of the top row in one direction and the seam allowances of the bottom row in the opposite direction to help ensure that the seams will lie flat (Figure 5). 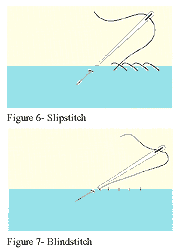 Hand appliqué is the best way to achieve the look of traditional appliqué. But using freezer paper, which is sold in grocery stores, saves time because it eliminates the need for hand basting seam allowances. Hand appliqué is the best way to achieve the look of traditional appliqué. But using freezer paper, which is sold in grocery stores, saves time because it eliminates the need for hand basting seam allowances.
Make templates without seam allowances. Trace the template onto the dull side of the freezer paper. Cut the paper on the marked line. Make a freezer-paper shape for each piece to be appliquéd. Pin the freezer-paper shape, shiny side up, to the wrong side of the fabric. Following the paper shape and adding a scant 1/4" seam allowance, cut out the fabric piece. Do not remove the pins. Use the tip of a hot, dry iron to press the seam allowance to the shiny side of the freezer paper. Be careful not to touch the shiny side of the freezer paper with the iron. Remove the pins. Pin the appliqué shape in place on the background fabric. Use one strand of sewing thread in a color to match the appliqué shape. Using a very small slipstitch (Figure 6) or blindstitch (Figure 7), appliqué the shape to the background fabric. When your stitching is complete, cut away the background fabric behind the appliqué, leaving 1/4" seam allowance. Separate the freezer paper from the fabric with your fingernail and pull gently to remove it. 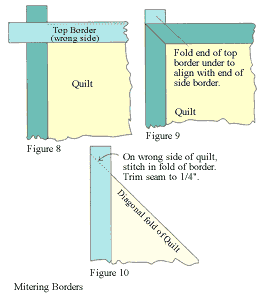 Mitered borders take a little extra care to stitch but offer a nice finish when square border corners just won't do. Mitered borders take a little extra care to stitch but offer a nice finish when square border corners just won't do.
First, measure the length of the quilt through the middle of the quilt top. Cut two border strips to fit this length, plus the width of the border plus 2". Centering the measurement on the strip, place pins on the edge of each strip at the center and each end of the measurement. Match the pins on each border strip to the corners of a long side of the quilt. Starting and stopping 1/4" from each corner of the quilt, sew the borders to the quilt, easing the quilt to fit between the pins (Figure 8). Press seam allowances toward border strip. Measure the quilt width through the middle and cut two border strips to fit, adding the border width plus 2". Join these borders to opposite ends of the quilt in the same manner. Fold one border corner over the adjacent corner (Figure 9) and press. On the wrong side, stitch in the creased fold to stitch a mitered seam (Figure 10). Press; then check to make sure the corner lies flat on the quilt top. Trim seam allowances. When the quilt top is complete, press it thoroughly before marking it with quilting designs. The most popular methods for marking use stencils or templates. Both can be purchased, or you can make your own. You can also use a yardstick to mark straight lines or grids.
Use a silver quilter's pencil for marking light to medium fabrics and a white chalk pencil on dark fabrics. Lightly mark the quilt top with your chosen quilting designs.
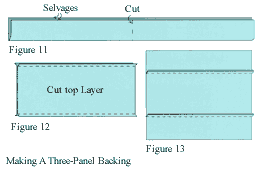 For the purposes of this article, backing yardage is given based on 45"-wide fabric unless a 90"-wide or 108"-wide backing is more practical. (These fabrics are sold at fabric and quilt shops.) Pieced or not, the quilt backing should be at least 3" larger on all sides than the quilt top. For the purposes of this article, backing yardage is given based on 45"-wide fabric unless a 90"-wide or 108"-wide backing is more practical. (These fabrics are sold at fabric and quilt shops.) Pieced or not, the quilt backing should be at least 3" larger on all sides than the quilt top.
Backing fabric should be of a type and color that is compatible with the quilt top. Percale sheets are not recommended, because they are tightly woven and difficult to hand-quilt through. A pieced backing for a bed quilt should have three panels. The three-panel backing is recommended because it tends to wear better and lie flatter than the two-panel type, the center seam of which often makes a ridge down the center of the quilt. Begin by cutting the fabric in half widthwise (Figure 11). Open the two lengths and stack them, with right sides facing and selvages aligned. Stitch along both selvage edges to create a tube of fabric (Figure 12). Cut down the center of the top layer of fabric only and open the fabric flat (Figure 13). Press seam allowances toward center panel. Prepare a working surface to spread out the quilt. Place the backing on the surface, right side down. Unfold the batting and place it on top of the backing. Smooth any wrinkles or lumps in the batting. Lay the quilt top right side up on top of the batting and backing. Make sure backing and quilt top are parallel.
Use a darning needle for basting, with a long strand of sewing thread. Begin in the center of your quilt and baste out toward the edges. The stitches should cover enough of the quilt to keep the layers from shifting during quilting. Inadequate basting can result in puckers and folds on the back and front of the quilt during quilting.
Hand quilting can be done with the quilt in a hoop or in a floor frame. It is best to start in the middle of your quilt and quilt out toward the edges.
Most quilters use a thin, short needle called a "between." Betweens are available in sizes 7 to 12, with 7 being the longest and 12 the shortest. If you are a beginning quilter, try a size 7 or 8. Because betweens are so much shorter than other needles, they may feel awkward at first. As your skill increases, try using a smaller needle to help you make smaller stitches. Quilting thread, heavier and stronger than sewing thread, is available in a wide variety of colors. If color matching is critical and you can't find the color you need, you can substitute cotton sewing thread if you coat it with beeswax before quilting to prevent it from tangling. Thread your needle with a 20" length and make a small knot at one end. Insert the needle into the quilt top approximately 1/2" from the point where you want to begin quilting. Do not take the needle through all three layers, but stop it in the batting and bring it up through the quilt top again at your starting point. Tug gently on the thread to pop the knot through the quilt top into the batting. This anchors the thread without an unsightly knot showing on the back. 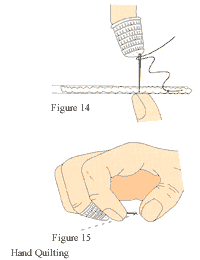 With your non-sewing hand underneath the quilt, insert the needle with the point straight down in the quilt about 1/16" from the starting point. With your underneath finger, feel for the point as the needle comes through the backing (Figure 14). Place the thumb of your sewing hand approximately 1/2" ahead of the needle. When you feel the needle touch your underneath finger, push the fabric up from below as you rock the needle down to a nearly horizontal position. Using the thumb of your sewing hand in conjunction with the underneath hand, pinch a little hill in the fabric and push the tip of the needle back through the quilt top (Figure 15). With your non-sewing hand underneath the quilt, insert the needle with the point straight down in the quilt about 1/16" from the starting point. With your underneath finger, feel for the point as the needle comes through the backing (Figure 14). Place the thumb of your sewing hand approximately 1/2" ahead of the needle. When you feel the needle touch your underneath finger, push the fabric up from below as you rock the needle down to a nearly horizontal position. Using the thumb of your sewing hand in conjunction with the underneath hand, pinch a little hill in the fabric and push the tip of the needle back through the quilt top (Figure 15).
Now either push the needle all the way through to complete one stitch or rock the needle again to an upright position on its point to take another stitch. Take no more than a quarter-needleful of stitches before pulling the needle through. When you have 6" of thread remaining, you must end the old thread securely and invisibly. Carefully tie a knot in the thread, flat against the surface of the fabric. Pop the knot through the top as you did when beginning the line of quilting. Clip the thread, rethread your needle, and continue quilting. Machine quilting is as old as the sewing machine itself; but until recently, it was thought inferior to hand quilting. Fine machine quilting is an exclusive category, but it requires a different set of skills from hand quilting.
Machine quilting can be done on your sewing machine using a straight stitch and a special presser foot. A walking foot or even-feed foot is recommended for straight-line quilting to help the top fabric move through the machine at the same rate that the feed dogs move the bottom fabric.
Regular sewing thread or nylon thread can be used for machine quilting. With the quilt top facing you, roll the long edges of the basted quilt toward the center, leaving a 12"-wide area unrolled in the center. Secure the roll with bicycle clips, metal bands that are available at quilt shops. Begin at one unrolled end and fold the quilt over and over until only a small area is showing. This will be the area where you will begin to quilt.
Place the folded portion of the quilt in your lap. Start quilting in the center and work to the right, unfolding and unrolling the quilt as you go. Remove the quilt from the machine, turn it, and reinsert it in the machine to stitch the left side. A table placed behind your sewing machine will help support the quilt as it is stitched.
Curves and circles are most easily made by free-motion machine quilting. Using a darning foot and with the feed dogs down, move the quilt under the needle with your fingertips. Place your hands on the fabric on each side of the foot and run the machine at a steady, medium speed. The length of the stitches is determined by the rate of speed at which you move fabric through the machine. Do not rotate the quilt; rather, move it from side to side as needed. Always stop with the needle down to keep the quilt from shifting.
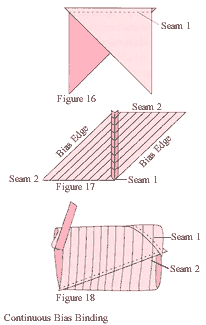 A continuous bias or straight-grain strip is used to bind quilt edges. Bias binding is especially recommended for quilts with curved edges. Follow these steps to make a continuous bias strip: A continuous bias or straight-grain strip is used to bind quilt edges. Bias binding is especially recommended for quilts with curved edges. Follow these steps to make a continuous bias strip:
1. Start with a square of fabric. Multiply the number of binding inches needed by the cut width of the binding strip (usually 2-1/2"). Use a calculator to find the square root of that number. That's the size of the fabric square needed to make your binding.
2. Cut the square in half diagonally.
3. With right sides facing, join triangles to form a sawtooth as shown (Figure 16).
4. Press seam open. Mark off parallel lines the desired width of the binding as shown (Figure 17).
5. With right sides facing, align raw edges marked Seam 2. Offset edges by one strip width, so one side is higher than the other (Figure 18). Stitch Seam 2. Press seam open.
6. Cut the binding in a continuous strip, starting with the protruding point and following the marked lines around the tube.
7. Press the binding strip in half lengthwise, with wrong sides facing.
To prepare your quilt for binding, baste the layers together 1/4" from the edge of the quilt. Trim the backing and batting even with the edge of the quilt top. Beginning at the midpoint of one side of the quilt, pin the binding to the top, with right sides facing and raw edges aligned.
Machine-stitch the binding along one edge of the quilt, sewing through all layers. Backstitch at the beginning of the seam to lock the stitching.
Stitch until you reach the seam line at the corner, and backstitch. Lift the presser foot and turn the quilt to align the foot with the next edge. Continue sewing around all four sides. Join the beginning and end of the binding strip by machine, or stitch one end by hand to overlap the other. Turn the binding over the edge and blindstitch it in place on the backing. At each corner, fold the excess binding neatly to make a mitered corner and blindstitch it in place.
|
|